Condensation in a sea container: why the cargo "cries" and how to fight it
A familiar situation: you buy an excellent, absolutely airtight sea container for a warehouse, load goods or personal belongings into it, and securely lock the doors. And after a couple of months you open it and see that the cardboard boxes have softened, rust has appeared on the tools, and water is literally dripping from the ceiling. The first thought is that the roof is leaking. But most often the problem lies elsewhere: it is condensation.
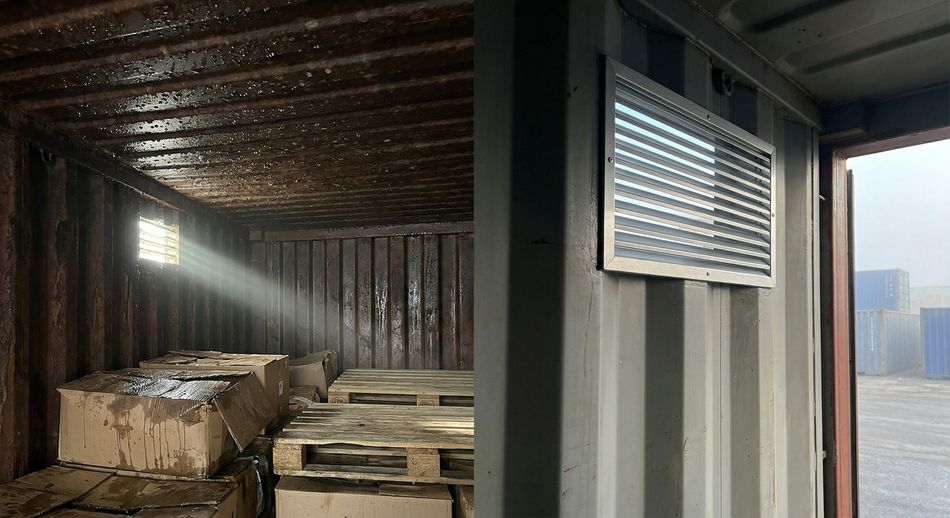
In logistics, there is even a special term for this phenomenon — "container rain". Let's figure out where the water inside the iron box comes from and how to solve this problem once and for all.
Where does the moisture come from? A little physics
A sea container is, in essence, a huge thermos made of durable steel. Steel has excellent thermal conductivity. During the day, the container heats up in the sun, and at night it cools down quickly.
Inside there is air, which always contains some percentage of moisture. If you loaded wooden pallets, cardboard packaging or goods that themselves emit moisture (for example, grain or fabrics) inside, the humidity inside becomes even higher.
When the temperature overboard drops sharply, the steel walls and ceiling cool down. The warm, humid air inside comes into contact with the cold metal, the so-called "dew point" is reached, and excess moisture falls out in the form of drops. Then gravity does its job — the drops fall right onto your cargo.
How to get rid of condensation: working methods
It will not be possible to completely cancel the laws of physics, but it is possible to minimize their consequences. Here are a few practically proven solutions.
1. Use moisture absorbers (desiccants)
This is the simplest and fastest way if the container is used for transportation or temporary storage. Special bags with silica gel or calcium chloride are simply hung under the ceiling (on special rings that are in most containers). They are able to absorb a volume of moisture exceeding their own weight several times. The main thing is not to forget to change them as they fill up.
2. Organize proper ventilation
From the factory, any standard container is equipped with small ventilation grilles. Their task is to equalize the pressure and provide minimum air circulation.
If the container stands stationary and is used as a warehouse, this is often not enough. In this case:
- Additional ventilation grilles are installed (usually diagonally — at the bottom on one side and at the top on the other, to create natural draft).
- Exhaust fans are mounted. Even a simple turbine on the roof, working from the wind, is able to pull out excess moisture and save the situation.
3. Container insulation
If you plan to use the container as a permanent warehouse, workshop or garage, the best solution is to shift the dew point. For this, the container is insulated from the inside. Spraying polyurethane foam (PUF) is ideally suited — it creates a seamless layer that sticks dead to the metal and leaves no air gaps where water could accumulate.
What absolutely cannot be done
To not aggravate the humidity problem, avoid typical mistakes when loading:
- Do not seal the factory ventilation. Many do this for the winter so that "heat does not leave", but in the end they get a greenhouse.
- Do not put the cargo close to the walls. Always leave a gap of at least 10–15 centimeters between the boxes and the metal for air circulation.
- Do not block air flows. Try not to stuff the container under the very roof, leave free space at the top.
- Do not store wet materials without insulation. If you need to bring in boards wet after the rain, be prepared for the fact that water from them will evaporate and settle on the ceiling.
The right approach to the microclimate inside the container will save you a lot of nerves and money. Sometimes it is enough just to competently arrange the cargo and hang a couple of bags of silica gel to forget about the "container rain" forever.


